Wednesday, June 24, 2009

More Razorback

The Razorback is now glued together into one and is starting to resemble an actual dedicated transport. I do notice that trying to paint individual pieces at different times was a huge mistake. I have put foundation on the body of the tank, but the bottom have one color and the hatches another etc. I don't think the body will match either. Oh well, it's my first try with yellow, and I have found it to be better to move on than to get stuck. I've got another tac squad to paint after all (and a few other pieces).


I am seriously thinking of investing in an airbrush in the future. The cover well and I could easily put down many coats of paint evenly. See how the hatches stand out here (even if I haven't actually started the yellow coat over the foundation coats yet).


You can even see how the yellow is uneven as hell here :(


The back hatch is magnetized, that is a part I am pleased with :) Also the tracks looks real nice.


Funny enough the inside of the Razorback looks, to me, real nice. Fenris Grey all the way baby! Also brushed metal + Badab Black is a fantastic little invention. Or rather metal + any dark wash. Maybe I should try it with green, purple, or blue, just for the heck of it :)

But you can see that I now have Fenris Grey insides on all that hatches. I plan on having anything that isn't outer hull in FG and add transfers and some black details on the outside to make it a bit more interesting. I will number it 'I' as it is the first armored vehicle I do have for the Fists. I do feel a bit miffed at how much that isn't included with the Razorback though, the second bolter that goes in the front isn't available so I can't build a Rhino with two bolter-thingies for instance. And only two main weapons out of five or six for the Razorback. Bad Games Workshop, bad, bad, bad.

I am getting really curious of what a 750p army can do. We'll see if I am a tactical genius or a heretic :)


Sunday, June 21, 2009

Working on my Razorback

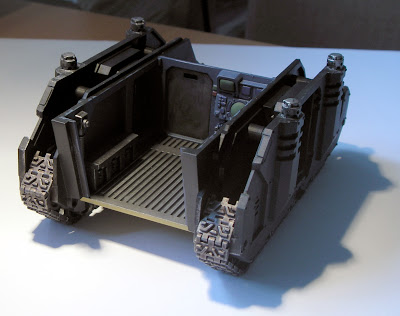
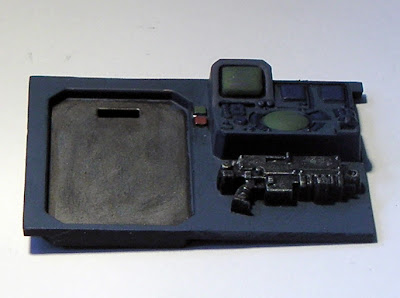
I need to get my Razorback in at least a state where I can play with it, even if it won't look finished or pretty. But being the little weirdo I am I do want to paint the inside of the tank, and to do so I will have to do some assembly - paint - assembly - paint iterations. I have assembled the sides with the tracks and glued them together, but I haven't glued them together with each other yet, so they are not glued to the bottom nor the panel+weapon "thing".

Here's a pic of the inside:


It's a bit hard to see (I need more sources of light to get better pictures) but I hope you can see that I have painted the inside in my new favorite color: Fenris grey. It is one awesome color and I couldn't wait to get to paint Space Wolfs with it, so I chose it for the inside of the tank. It's just the foundation paint and sometimes I used a little blue wash (GW line) and a lighter blue foundation paint to highlight buttons etc. Painted the triangular buttons red and green as well, as I wanted them to pop a bit. They look like door open/close buttons so I thought, what the heck :) Here's another shot at the inside. Not that I painted the floor gunbolt metal with a badab black wash and touched it up with some more metal. I need new drybrushes though, they are already worn out from Cygnar painting:) Wish GW's new huge drybrush was released. Guess I will just buy GW's two drybrushes plus a large one (tanks need large brushes!).


I am pleased with the tracks. Tin bitz + some gunbolt metal + devlan mud wash and voila. Stole that one from GW's site :) It was real simple, fast, and looks good.

Less easy is this darn yellow. I do like the foundation WAAY better than the failure that was the Army Painter spray, but it is really hard to get an even coat on there. I have been playing around with how much I should water the paint and such, but it is still really really hard. Oh well, maybe in the end I'll learn something :) Plus I've got Orks and Eldars to learn how to paint as well. And Retribution, and Space Wolfs, and more Cygnar!


This part I do like. It looks pretty good (even better RL). Just enjoy the picture:


I wanted to have working side doors, and here you have one of them. I did change my mind about the color though, and now the inside is Fenris Grey instead. To match with the rest of the insides. The backdoor (*tihi*) will have the same setup with Fenris Gray inside and yellow on the outside so it will match.

The neat thing is that I have magnetized the door so I can pull it off, put it back on, and have it open for the Marines to run out. Like this!


You can also have it shut. I hope I won't end up having it get too thick because of paint and be hard to fit. I've got the other door painted and magnetized as well.


I have painted some more after these pictures were taken and I am going to finish magnetizing the back door tomorrow. I had some mishaps and will have to redo the fitting of the magnets. The magnets are 1 x 1.5 x 5 mm btw. Quite a handy size and fairly strong. Thus far recommended :) Bought of a German site.

Stay tuned for the next update. I am determined to get this Razorback in playable fashion this week, maybe even fully painted! I do need to start using the transfers though. On the squads as well.

//Brother Captain Flekkzo

Terminators

I've painted one out of five Space Marine Terminators now. I am still playing around with different ways of getting yellow to not look awful, and I ended up with a way to bleak looking terminator. So I gave it some more wash and then drybrushed a bunch of yellow on it and gave it some slightly more pronounced edge highlights. I am not too fond of the look you get from it though, and I don't particularly like the idea of layering like crazy (nor the idea of painting smaller and smaller areas as I get lighter and lighter colors). I am still sold on the idea of wet blending. Tried it a bit on the cloth of the sergeant of the tactical squad earlier. Maybe I'll go nuts and use it much more on the Captain :)

Here's the Terminator! I'd love some opinions! I will paint the other four with similar highlighted edges (i.e. painted on instead of drybrushing, with the exception of the helmet).

Thursday, June 18, 2009

Warmachine league

Something I didn't expect happened today. I now have no less than six wins and one loss in the FLGS Warmachine/Hordes league. Six in a row even. And with a pretty themed up army even, and sometimes some pretty awful dice rolls. Life is sometimes funny :) Cygnar will prevail!

I also started to paint one more gobber today, but I think that I honestly failed with the skin. The drybrushing just made it look weird instead of a lean green machine. Gotta figure that one out. I've got no less than one lots (technical Mekboy term mind you) of Orks to paint even for my 750p list, and a lot of them have green skin to be painted. Or I could turn it around, after painting that many Orks I better improve my technique *somehow* :) And one nifty thing with Orks is, they shouldn't look uniform, so if I try out different colors and techniques, that is just Orky anyways.

In Space Marine land I've painted a termy today. The GW foundation colors thus far has been a hit. I recommend! Go buy!

Wednesday, June 17, 2009

They are painted!

Here comes the lads! A full 10 man Tactical Squad with the optional heavy weapons and the sergeant. I tried putting some extra color on the sergeant by using London Gray on his "extras" and then bathing it in Badab Black wash. Turned out pretty good. I have mostly yellow and black on the models, with some mithril metal color lightly brushed on skulls and weapons and the likes.

The yellows turned out quite dirty and rough, so they do not look like shining plastic storm troopers ready to rock the Milky Way, but rather a rough bunch of guys. Oh well, first time painting Space Marines, can't expect too much:) Hopefully I made some improvements in my brush handling techniques along the way.

Next up I should start to assemble, magnetize, and paint the Razorback. I want to paint the insides so I will need to assemble, paint, assemble, paint, etc. I should also at least assemble the second tactical squad so that I have my army at full strength and can play with it :) I need opponents!


I'd love me some comments, good and bad. I think the thing that is most obvious though is the low amount of highlights. I tried drybrushing them on and that might not have been a total success, plus the Army Painter spray didn't work out. I will buy me some Iyanden Darksun paint and see how that will turn out for me instead :) The sergeants red cloth did get some highlights that turned out quite well though, even if the method was total madness (wet blending was intended, but, well, ehm, let's not continue down that road).

Oh, and they need their Imperial Fists transfers on the shoulder pads, and some stuff on their bases (gravel + static grass I think). More to come :)

Saturday, June 13, 2009

More Imperial Fists

Time again for some Imperial Fists! For some reason it felt easier to paint these guys as they are not my favorites. It's different with Cygnar, Eldars, and Orks. I have all chosen them with more emotional commitment. But even then these guys are starting to grow on me. They are freakin' hard to paint though, even though I am running with the simplest of simplest when it comes to color scheme. Let's face it, it is yellow, with black, and just a little red and bleached bone (for the purity seals, and you need to know what that is to find it in any of these pictures!). With that in mind it stills is a pretty cool color scheme. Who knows, maybe I'll decided that the other tactical squad is from another company, and thus will have red, or blue, or silver, or something else for the "trim" :) I do think that when I do the next squad I will make sure I paint then assemble when it comes to weapons so that I can paint the imperial birdie in black (or red, or whatever company I choose).

So on to the pictures, to the hotness itself! Check out these, ehm, Fists:) Here you see my very first yellow (army painter spray primer, looks like desert painted tanks) primed marine to the left. In the middle the experiment with london gray + yellow (I believe that it is Gold Yellow from Vallejo Game Color, but can't be sure coz the print came off and now I can't see the name) which turned out pretty, well, so so. And then the paint a bunch 'o layers marine to the right. It's just simply black primer (the Chaos Black primer rules!) and yellow on top, then a GW wash on top of that and some drybrushed gold yellow + some brighter yellow. Some brushed bleached bone for good measure as well on the black. These guys remind me of yellow storm troopers for some reason:)


Here the gang has been joined by two new recruits. Same yellow primer, but with slightly less sucky results. The primer gave me a really uneven and nasty finish. Even color but really rough texture. The tank in the desert feeling is *very* strong. This time around I tried being more careful and with slightly better result. I still don't know if I shook the can too much, too little, not chop sue enough, or whatnot. I did try applying the yellow color in a new way though. I did the same thing as if I would drybrush it on, with a drybrush brush (Citadel small drybrush), but didn't bother drying it off much. With some violent application it covered way better than the other technique, and quite fast too! Try it if you are in a similar situation. The guys furthest out to the left and right have one coat on each. I will apply at least one more, more than likely two, but by three I might be tired of it and will jump over to the "wash that bugger" step.

Should be pointed out that I will add the Imperial Fist transfers. I do feel envy of the insane amount of transfers that the ultra marines get, but damn it, no more Smurfs now! I do enjoy knowing that I will have one blue, one yellow, and one green army for 40k though:) And a gray one as well, because there is no way I will be able to keep away from the Space Wolfs:)


And before I sign off, there might be a mod in the pipeline for me. I've got an Assault Marine Sergeant with a power first that needs to become a tactical squad Sergeant. The best course of action seems to be to cut the power fist arm off and attach it to the original Sergeant. The Assault one has too different of a chest and it will look stupid. Silly GW for not including *all* freaking options, they should do that!

For the Emperor!

Thursday, June 11, 2009

Imperial Fists!

I think that I will swap out the Space Wolfs for some Imperial Fists instead. I'll go for the Space Wolfs when the new codex is out (only rumors I've read on the net, but you do know that everything you read on the net has to be true now don't it?). This means that I'll have Alaitoc Eldars, Imperial Fist Space Maries, and probably Goff Orks. I can fight myself basically:) I just need to assemble one tactical squad of 10 plus a razorback and I am in business for 750 points. I will cut down my original Tactical Squad to 6 (to fit in the Razor) and give the new ones some new nifty options. Endless hours of fun!
Greetings Space Marines fans. I thought that I should show proof of glueing, and here's a full Black Reach Space Marine army. A bit over 500 points I think. Neat huh? :) I tried some improved techniques for the photo so I hope you guys can see things more clearly this time. I think you do have to click on it though to get a good idea of how it really looks (the thumbnail seems quite blurry). I still have some issues with lighting the scene and I will have to go on a scavenger hunt to find a bunch of good lamps to use (since the sun seems to be hiding these days).

Next up, painting these sucks Chaos Black, spray style! Then either over to the Ork assembly line, Cygnar painting station, or I might just want to start painting the marines. I still want them to be Space Wolf colored though, which I still don't know if it is a good or bad idea. But Ultra Marines? I already have chosen blue *twice* for armies, can't have it on a third (thinking of Goff painting for the Orkz, simply because it is Orky).

I am also thinking of those foundation paints that GW puts out. This time maybe I'll just buy the *box* instead of buying them individually *cough* washes *cough*. Or I could just go for the gray and green colors:) I just wish I owned all paints in the range so I never had these problems, oh well, there is always The Future!

Wednesday, June 10, 2009

Sniffin' Glue

No pictures today, but I do own a Gorilla Pod and have read up on photography. I hope that future pictures will look much better than the horrors I've produced thus far. Maybe, just maybe, you all will think that I paint better if I post better pix, or you might actually see at what level I do paint :)

So why post anything? Because I've had some progress, I have previously glued up the Dire Avengers, I have cut out a whole bunch of Eldars from the sprue from which they came, and ta taaa, I have cut, cleaned, and glued the full Space Marine army from the Black Reach box. I will proceed to do the same for the Orks, and then possibly glue some stuff to the bases and then go all out and spray the whole bunch 'o them Chaos Black. Lots of paintin' to do!

And my Centurion still sits there on my table waiting to get painted:)

Oh, and there was some joy today as my packages from Germany arrived. Soo much packaging for such small things, but I now own a bunch of magnets that will magnetize a bunch of stuff for my 40k armies. Deffkoptas, Shining Spears, Falcon, Wave Serpent, and a lonely Autarch on a Jetbike will all get really nifty magnet connected flying bases. More to come!

Friday, June 5, 2009

Hunting the hunter

Time to paint some warmachine again! I have been real bad at painting my Eldars. I do have a squad of five Dire Avengers all glued up now, so I will more than likely give them a go. Question is, should I go for white or yellow helmets. I think I wanna go with standard Dire Avenger colors though, as I tend to enjoy having standard colors.

So back to the Hunter. I decided that I wanted a Cygnar look to it, since that is what I am going for in general, but I wanted to give it a little pathfinder touch. I did this by painting a few parts green instead of blue. Here's no less than four pictures, from four different directions! I did fail a bit with the flock so I have to add more, and I do want to "borrow" some water effect from someone so I can fill up the stream a bit. Still, I hope whoever reads this blogs finds it neat:) Haven't sprayed "purity seal" on it yet on account of the botched flocking.


Tuesday, June 2, 2009


This is a top view of my Bodger experiment. I green stuffed the base pretty much all over and filled up the hole with green stuff and secured the "tube" there, sticking up from the ground. I can't for the life of me decide if I should go with a grayish look where I drybrush in darker and lighter greys to make it look cement-like and get some stains on there, or if I should make it more into a "out in the field" type of base.

Out in the field definitely *would* make it look a whole lot more in place though, making it look like they are Field mechanics and not In a factory mechanics. Although do I get cover saves from being in a factory that I carry with me? Who knows? Who knows? Pray tell!

Other than that I need to fix the shiney top and again I don't know what to go for. Black and yellow? Just greasy black? Metal at the top end only like a battery? I don't have a clue! Help me out internets, give me a clue from the intertube!


And to top it off we have a full frontal fantasy, ehm, full metal fantasy Goblin Bodger from the front. Complete with dog tags and blue Cygnar jacket. And muscles. Bet this little guy gets all the Goblin ladies knickers in a twist we he gets home. He better survive the battle first though, not known to be sturdy our little Goblin friends!

Monday, June 1, 2009

More bases

Time for some pictorial evidence to my basis. Writing this it strikes me that the layout aren't the best (and why do I have a tiny tiny little window to edit in, when I have a huge browser window that is now 70% empty? Silly!). Maybe I'll try to have the text flow around the images in the future. Might be better, might be worse, we'll see:)

So here comes to pictures of the Hunter. The model itself isn't even primed as you can see and thus shines like crazy. My awesome photographic skillz shows through as per usual. Although I blame the equipment!!! The idea is that there will be a little stream in front of the light 'jack and that round thing is a rock. I will flock the whole thing in dark green fluffy stuff, whatever it is, except the area where it has pushed away dirt. That is going to be dirt colored. Pretty amazing huh? :)

A different angle on the base.

This next one is my journeywoman. I have Haley and one squire on rocks, so I thought I'd throw her on rocks too. Several layers and a few small pieces that was wedged in strategic places. It already looks pretty OK to me. Going to do the usual black, and then lighter grays, but also some tin bitz (for that rocky glow from something that looks like quartz) and some of that green flock I so love to dash on everywhere! But just a little, I want it look like lush moss, not cover it up :) Think of it as a bikini for rocks!

My good old bodger, the only one painted. I cut a new hole in the base for the bodger further back, covered up the original slit (or whatever it's called) and then cut a huge gaping hole. In that hole I am going to put green stuff and build in the glass chamber (it's a glass fuse btw). I opened up one end on other one I have and I am drying cotton as we speak. I'm going to put some cotton in it, white and some shades of blue, to give it a smoke/lightning kind of flavor. We'll see how that goes! Then it's time to make it all happen :)

Remember, when there is Cygnar around, lightning will strike :)